Amplify POC

This document is aimed to help you familiar with Amplify quickly. In addition, I’ll take you to go through the code structure and deployment architecture of my POC.
What is Amplify
Amplify is an all-in-one platform for frontend developers to develop, test, and deploy the whole website or mobile app. The frontend developers only need to know vanilla JavaScript or React or Vue.js, the knowledge of RestAPI, and database management is not necessary for this platform cause Amplify Studio can help frontend developers to maintain these through the UI.
Pros
- The learning curve is not higher for frontend developers.
- Easily to connect with other AWS services (Cognito, Lambda, AppSync, DynamoDB)
- Less maintenance works.
- Automatic CI/CD.
- Serverless.
Cons
The learning curve is a little bit steep for backed developers. (Developers should learn React and GraphQL, and know how to use Figma)
Not good for developing a complex website, you still need to know some backend knowledge to develop advanced features.
For UI components, you can’t design a Figma template by yourself, you need to modify the fixed template created by Amplify team.
Use Cases
Based on the analysis above, Amplify is great for simple website development or mobile app with basic CRUD functions.
Like a file management system, or a simple CRM system.
How to Start
You can follow the link below to go through this workshop quickly. It provides almost everything you need to know in Amplify.
https://catalog.us-east-1.prod.workshops.aws/workshops/84db0afb-0279-4d29-ae26-1609043d5bfd/en-US
Tools for Development
Amplify Studio
- This is an online design platform, you can design your website or mobile app on this for most features. But for some custom features, you still need to develop in your local machine, then use Amplify CLI to sync your local changes to the remote system.
Amplify CLI
- You can use Amplify CLI to complete all configuration and development and not to use Amplify Studio
- You can reach out to this link to learn more about this. https://docs.amplify.aws/cli/
Git CLI
For CI/CD and deployment, you need to commit your local codes and push them to the remote repository to activate CI/CD. After that, you can access your remote website through a fixed URL.
For local deployment, you can use the npm command to preview changes.
1
npm start
I still want to summarize all steps for my Amplify POC, you can check this first to get a landscape of development in Amplify.
Steps for Amplify Development
Initialization of Amplify
Install Amplify CLI
1
npm install -g @aws-amplify/cli
Amplify configuration
1
amplify configure
Create a new React app
1
npx create-react-app amplify-poc
Amplify initialization
1
amplify init
Install necessary packages
1
npm install aws-amplify @aws-amplify/ui-react
Authentication (Using AWS Cognito for SSO)
Find an existing Cognito User Pool (e.g. Okta ) and create a new app client in it.
Create a new identity pool that connected with this Cognito User Pool and the new app client
Authentication configuration in Amplify
1
amplify add auth
Follow the instruction in the command line and choose the user pool and identity pool, then push your changes to Amplify studio
amplify push.Important Caveat
After this authentication configuration, you might find there’re two sets of Cognito Configuration. One is for Amplify Studio authentication, and another is for this new website or new mobile app authentication. So, please be aware of which one is amplify created automatically, and which one is created by yourself.
Importing UI components from Figma
- You can only use an Amplify-built Figma template, Amplify can’t import components built by yourself. The template link shows below.
https://www.figma.com/community/file/1047600760128127424
You can make a copy of this template and do some modifications based on this template. (like creating a new page component by using an existing UI component).
BTW, you can also use my POC template.
https://www.figma.com/file/w9yXc7rxVcFQCAElNNmmDO/AWS-Amplify-UI-Kit-Community
Data model design
Login to Amplify Studio, then you can design your data model in this online platform.

S3 configuration
Follow instructions on AWS Amplify.
By default, the files you uploaded will store in the public folder.
Frontend development
Develop in your local machine, and you can preview by using the npm command
npm startFor your frontend development, all codes are located in the src folder.
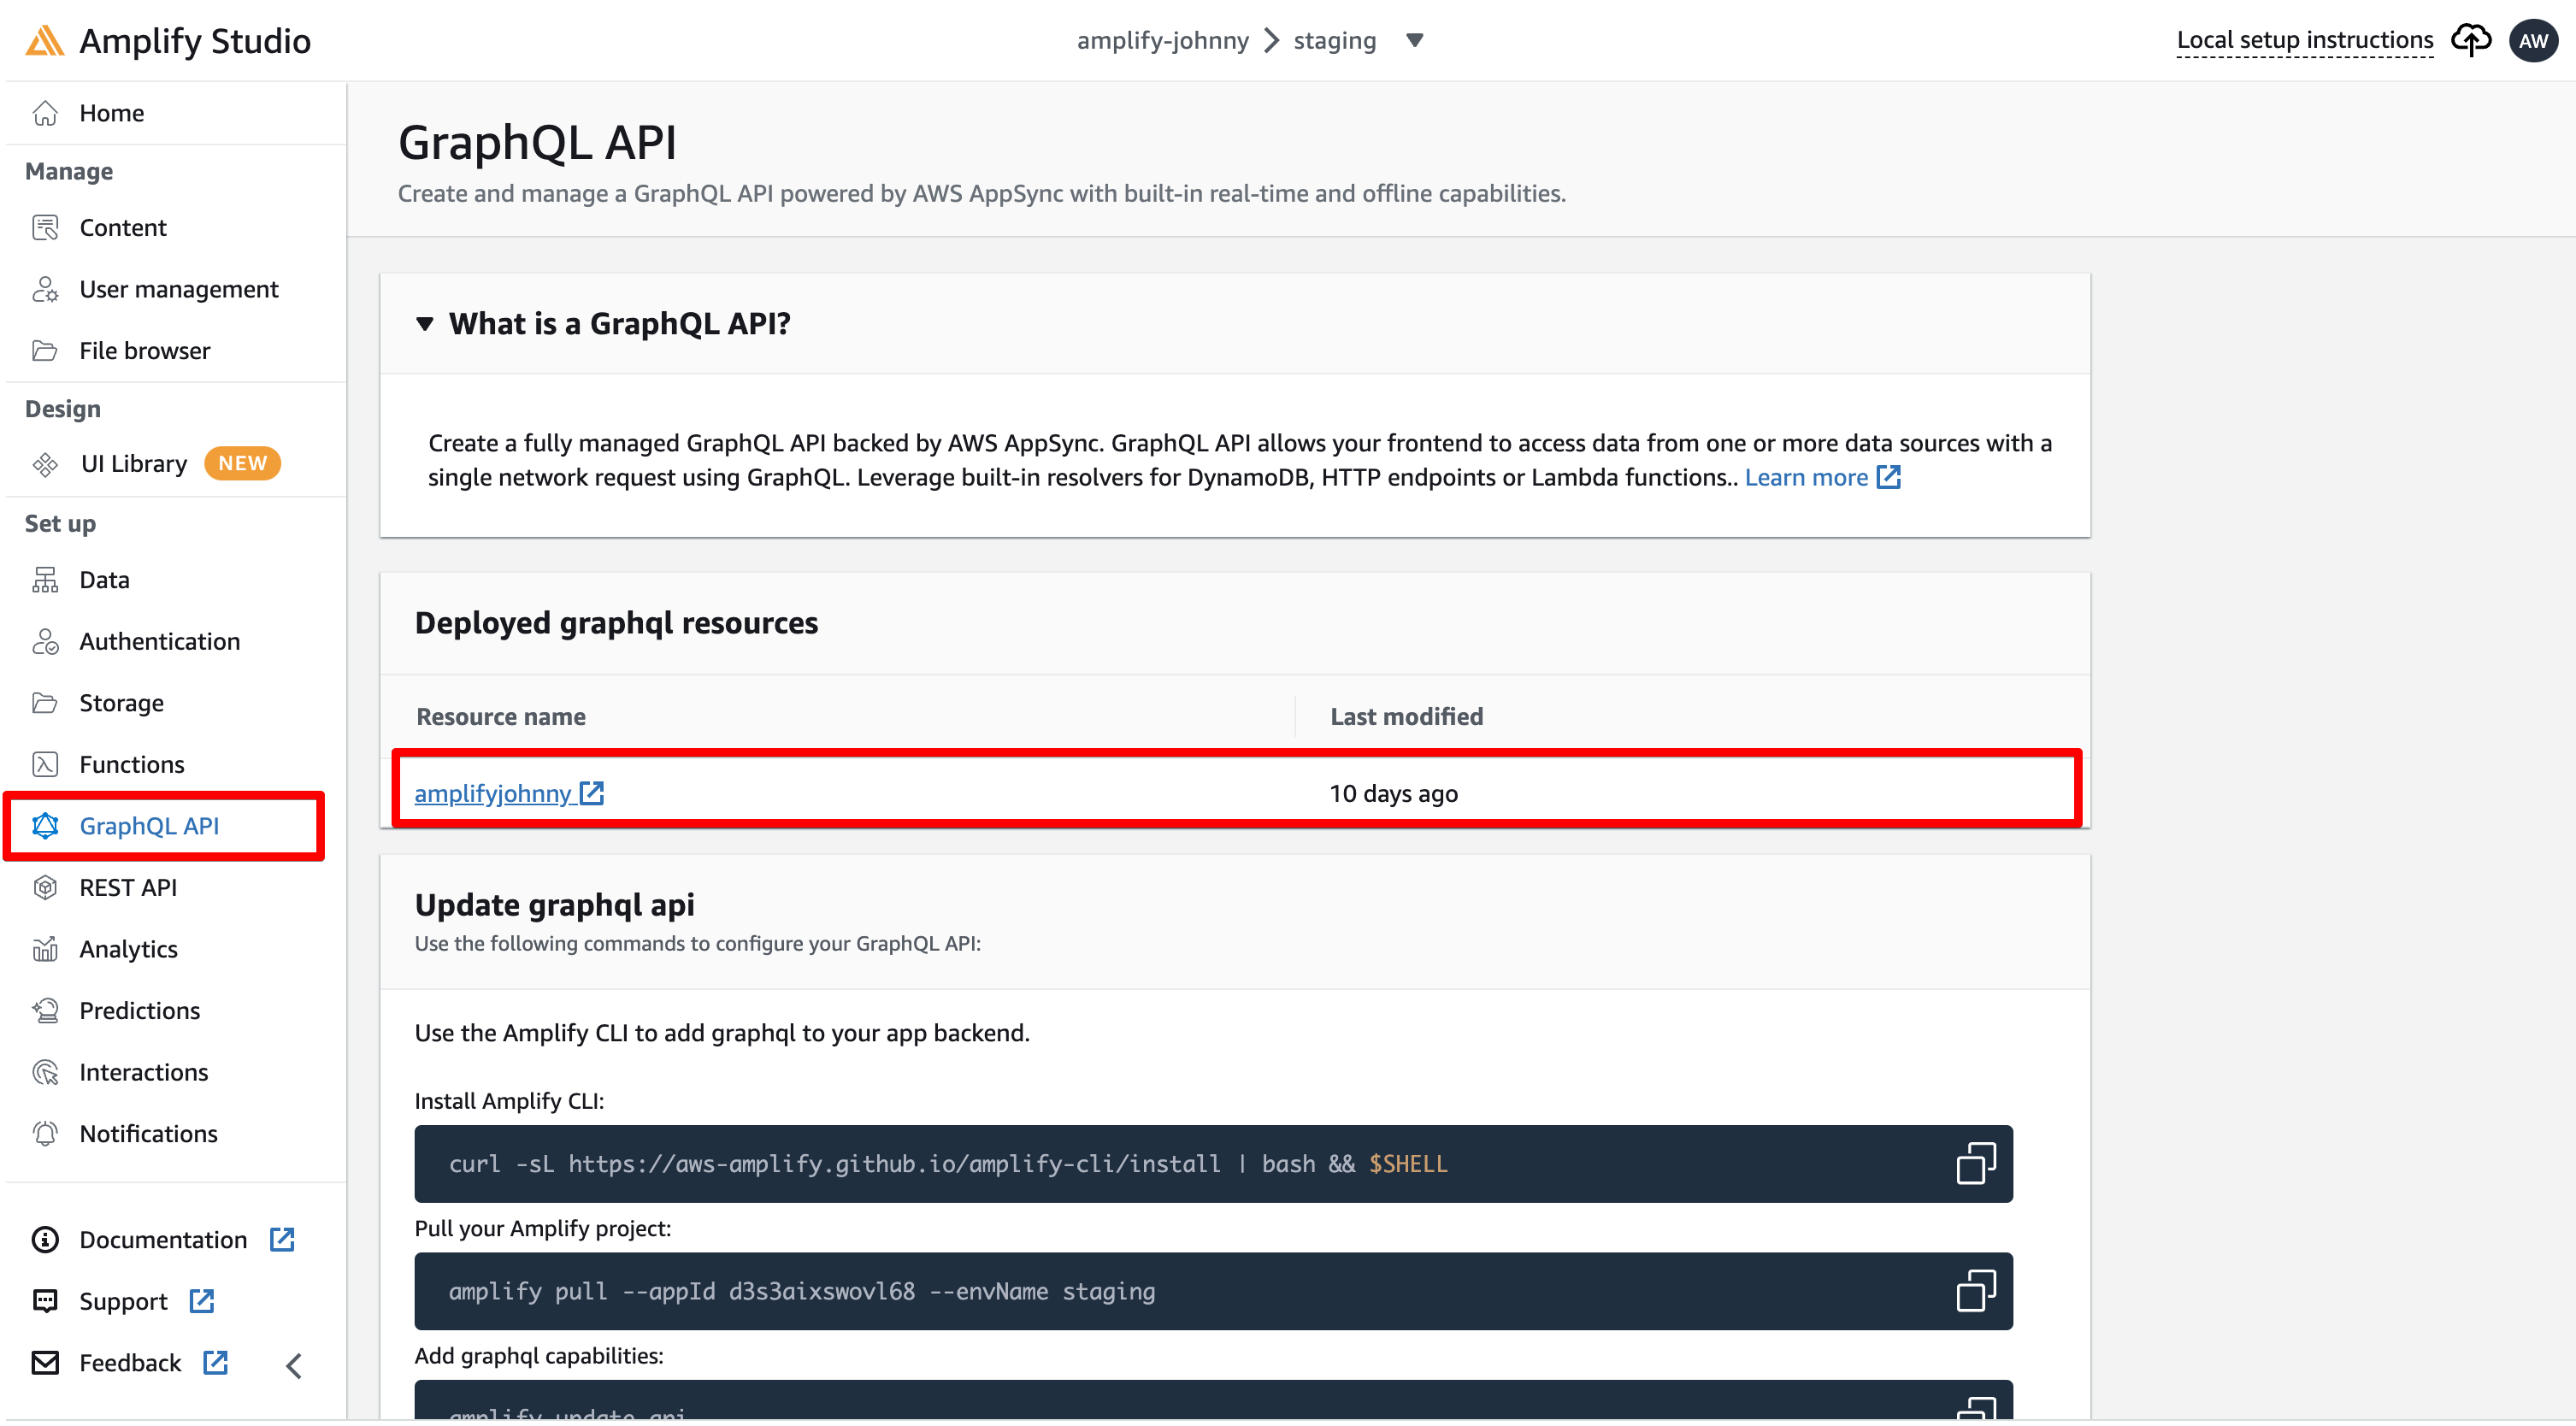
API development
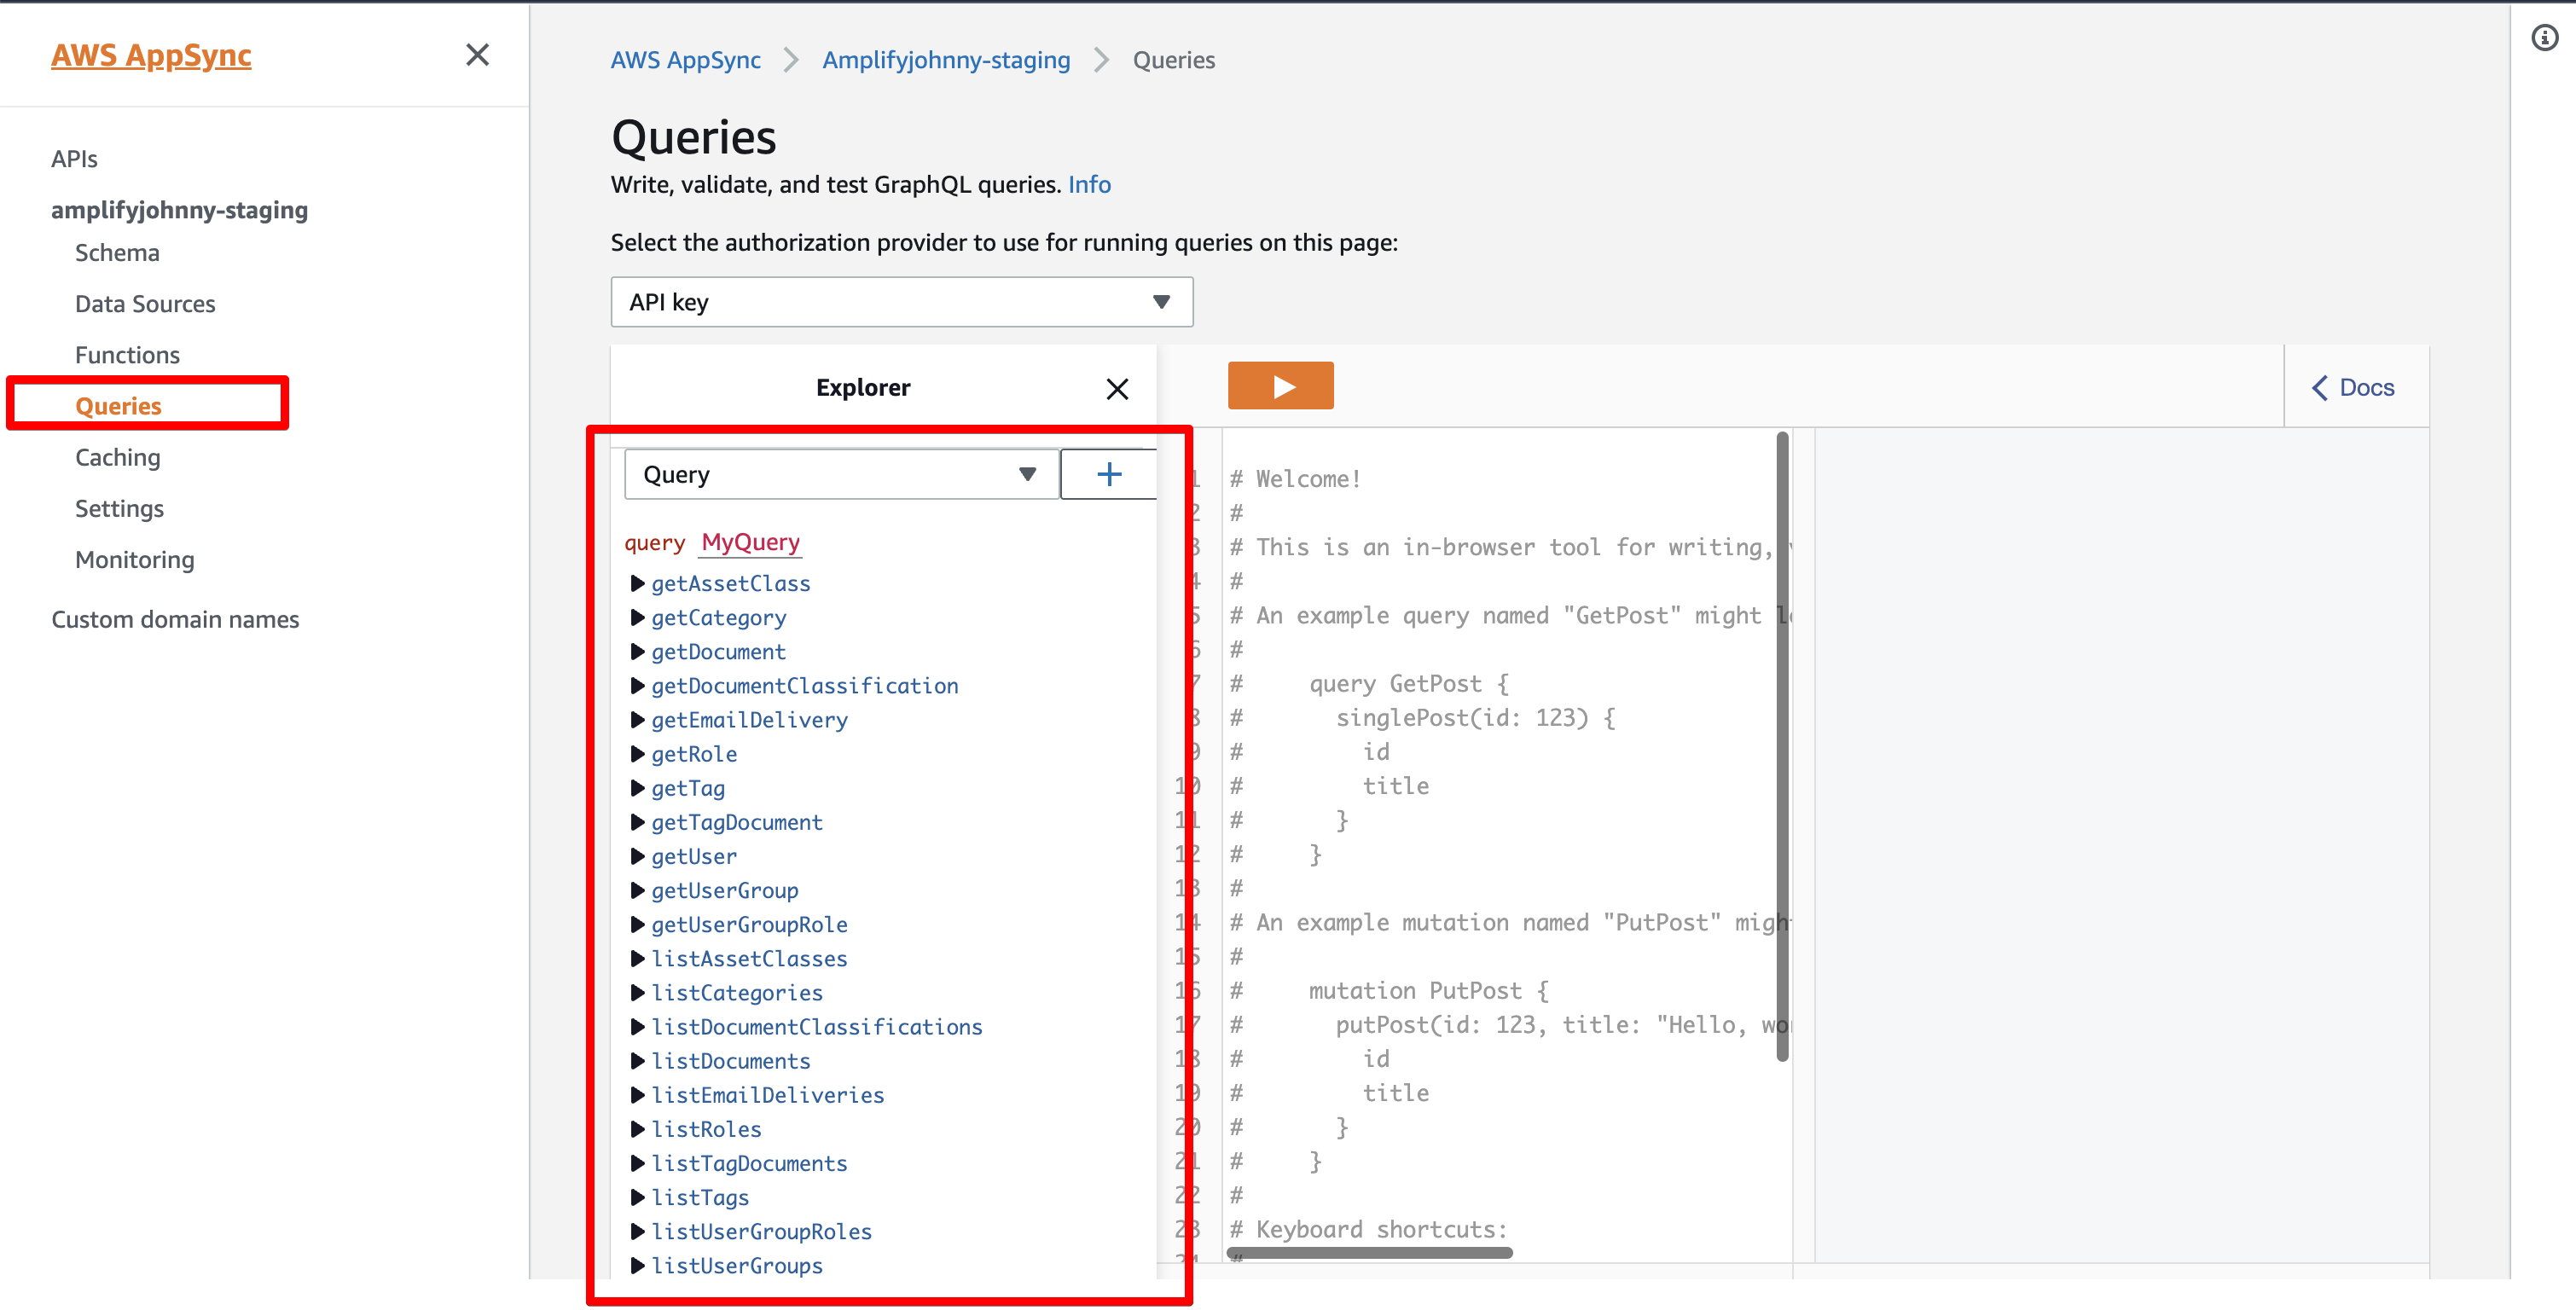
After you finished data model creation, Amplify Studio will create all related GraphQL queries for you automatically.
Write and test your GrahQL script in Amplify Studio.
Copy scripts into your local codes.
Import GraphSQL queries into your React codes.
Lambda development
Amplify CLI
1
amplify add function
Development in your local machine
Find your created Lambda function, and write your features in the src folder.
Add endpoint for Lambda
Using Amplify CLI and choosing REST as the calling method
1
amplify add api
Then, in your React codes, you can call this API by
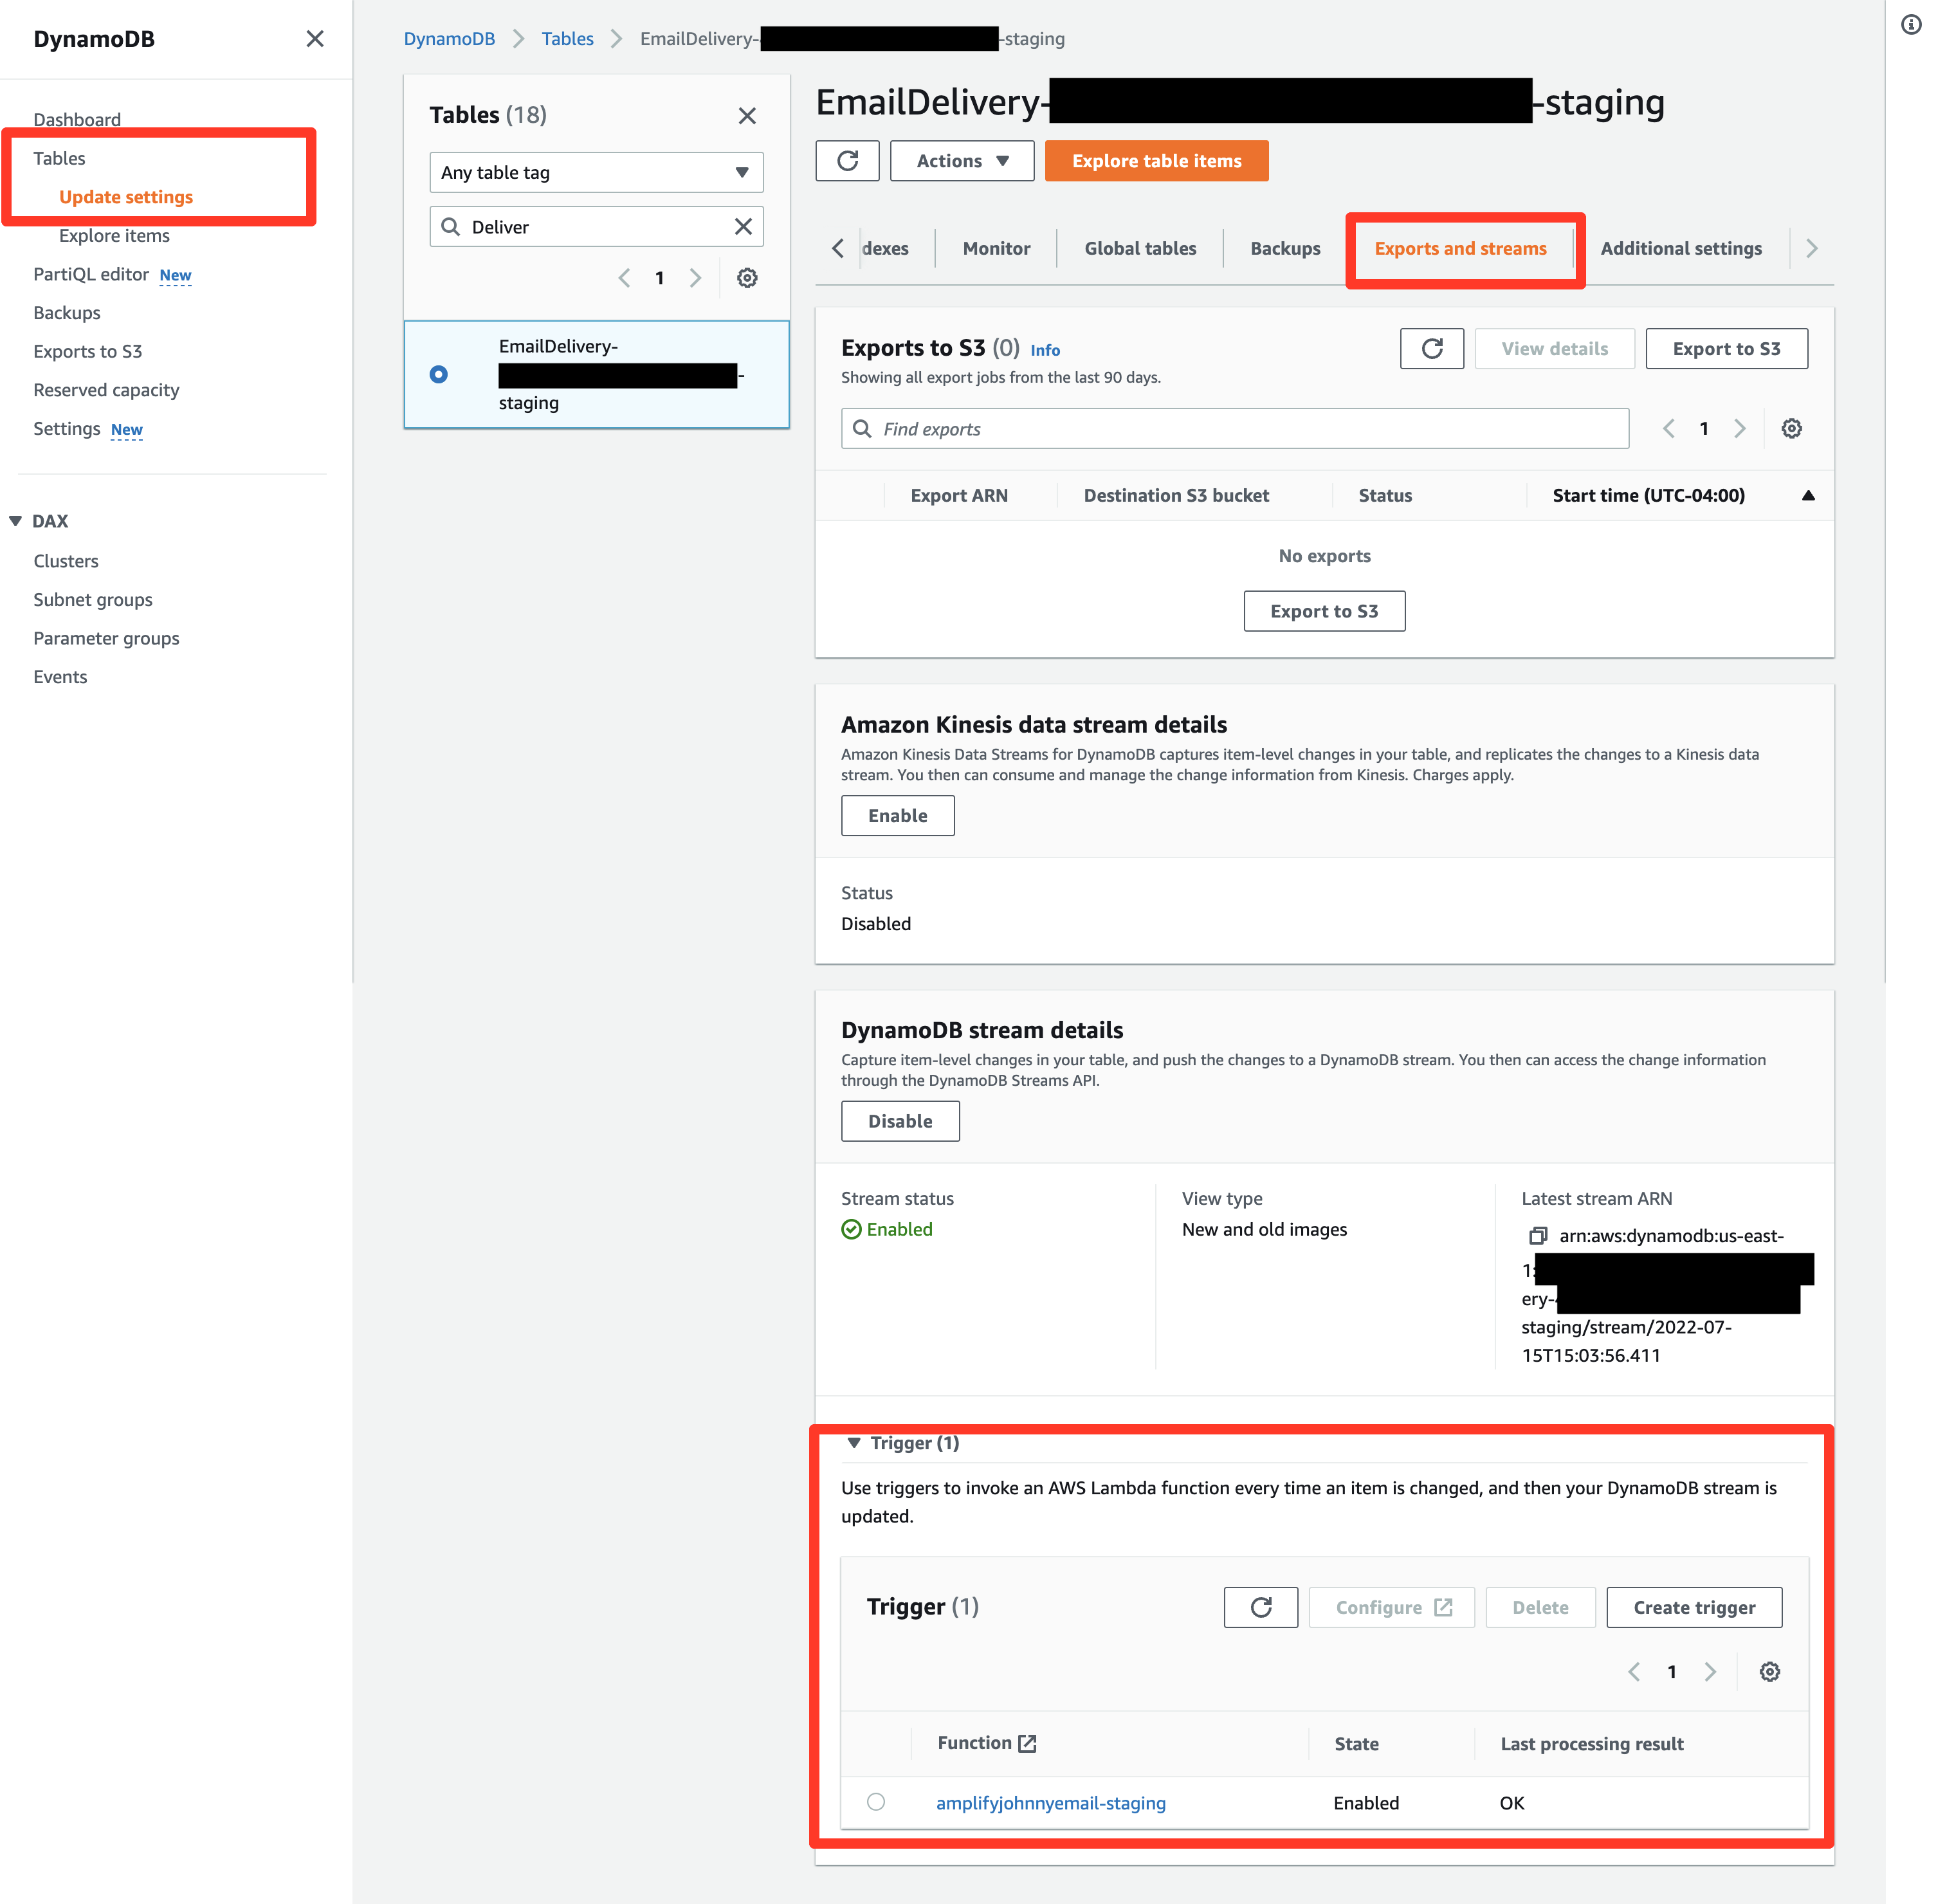
API.getIn addition, we can also use DynanomoDB to trigger a Lambda function. Just like the screenshot below.

Amplify POC
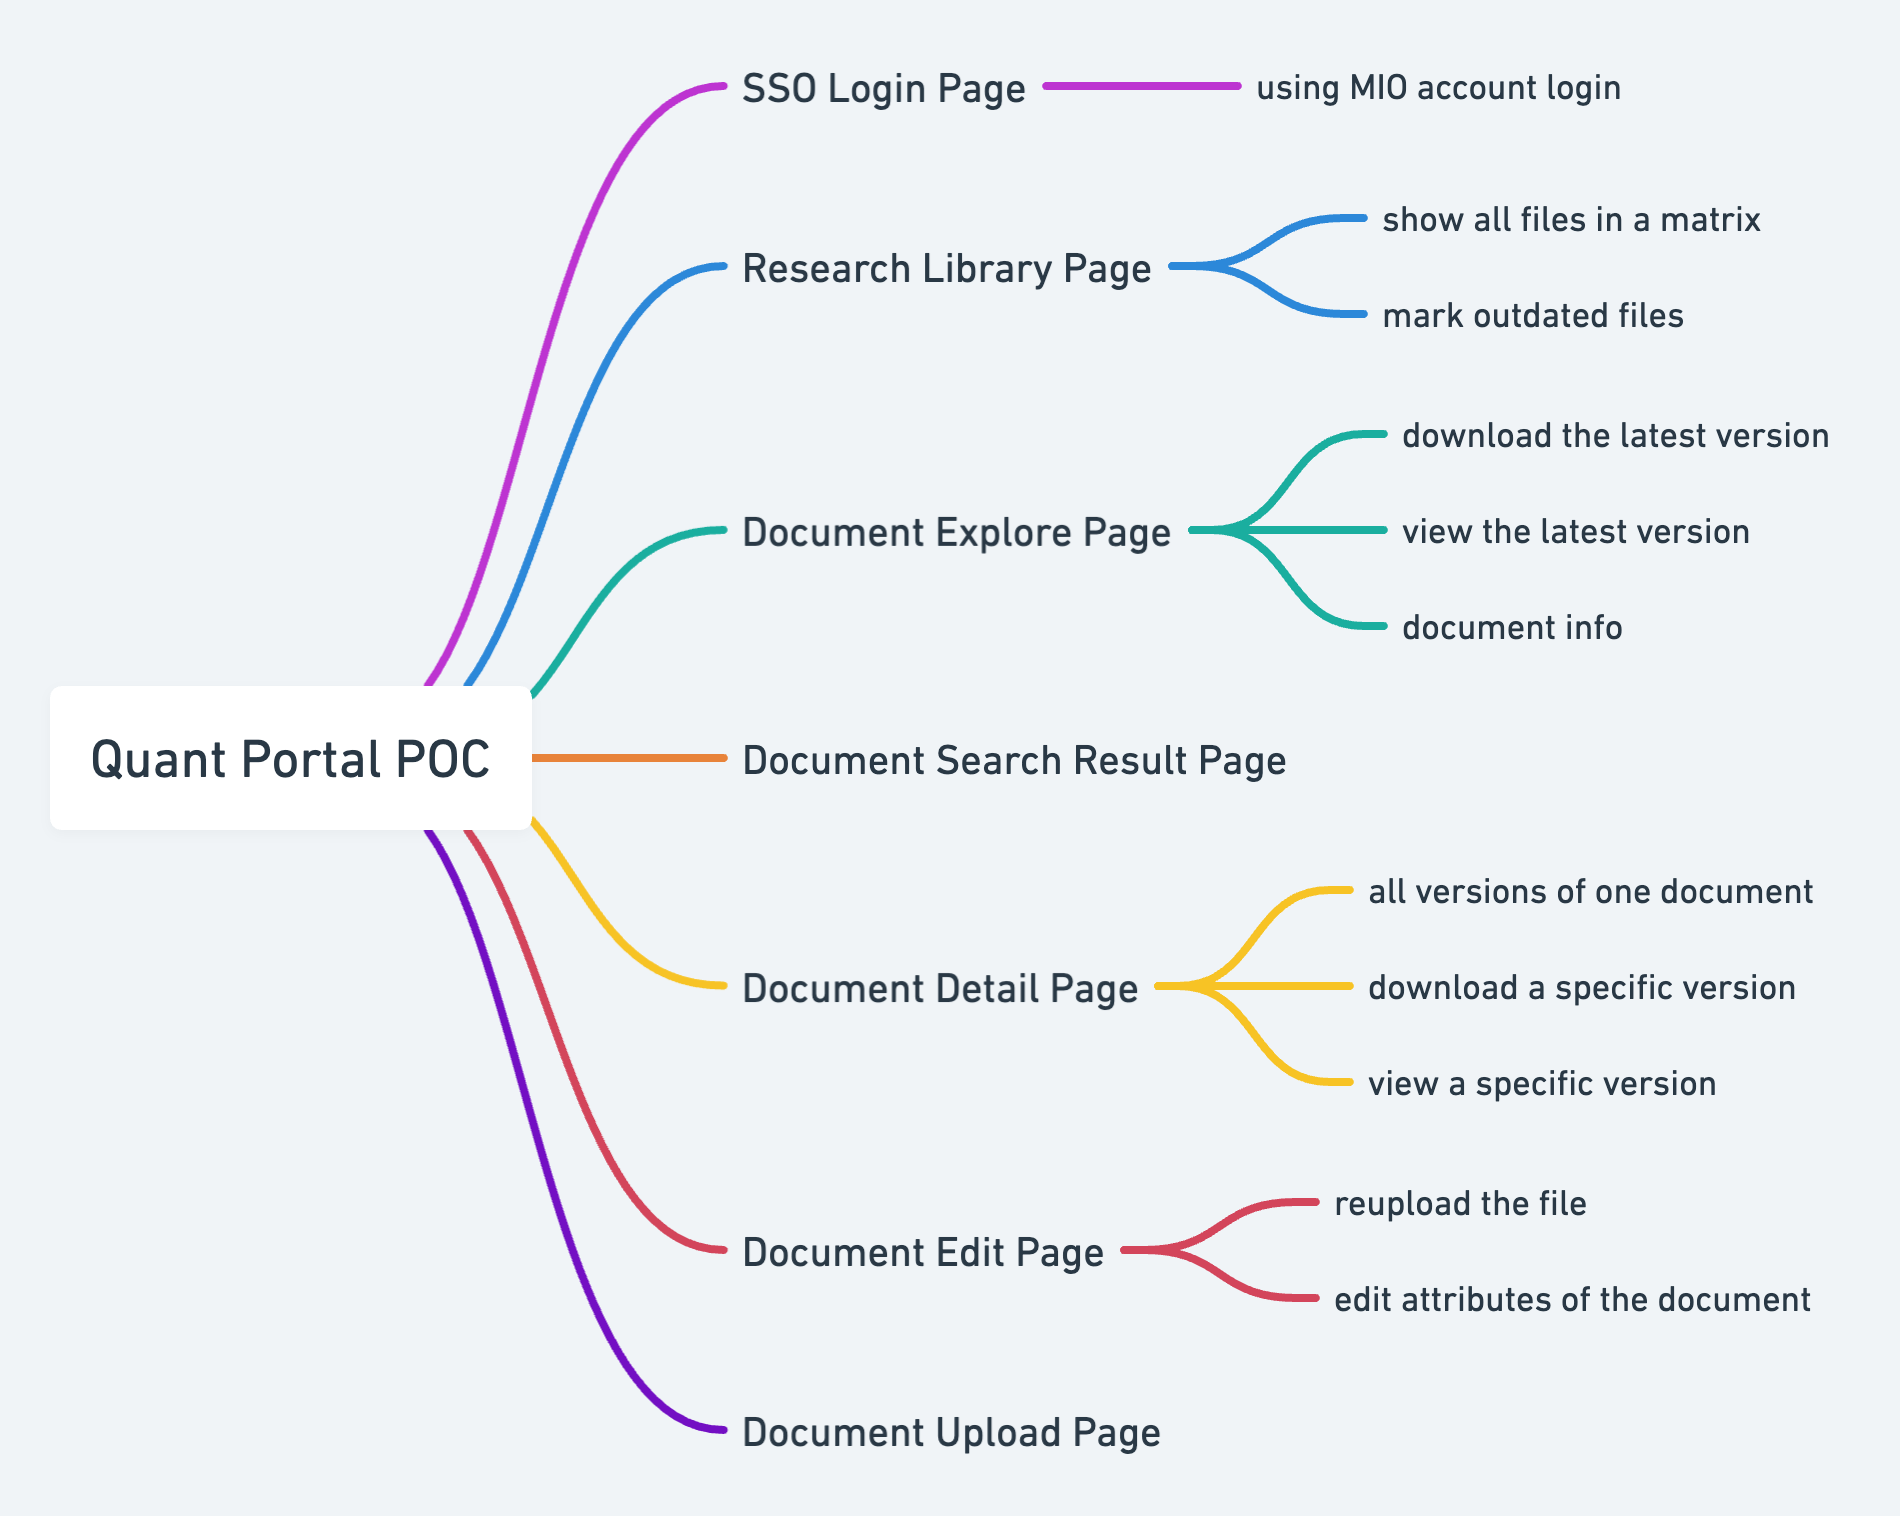
Business Requirements
This POC is aimed to recreate a Quant Portal website that is originally created based on SharePoint.
You can treat this Quant Portal as an online file management system.
The main business requirements show below.
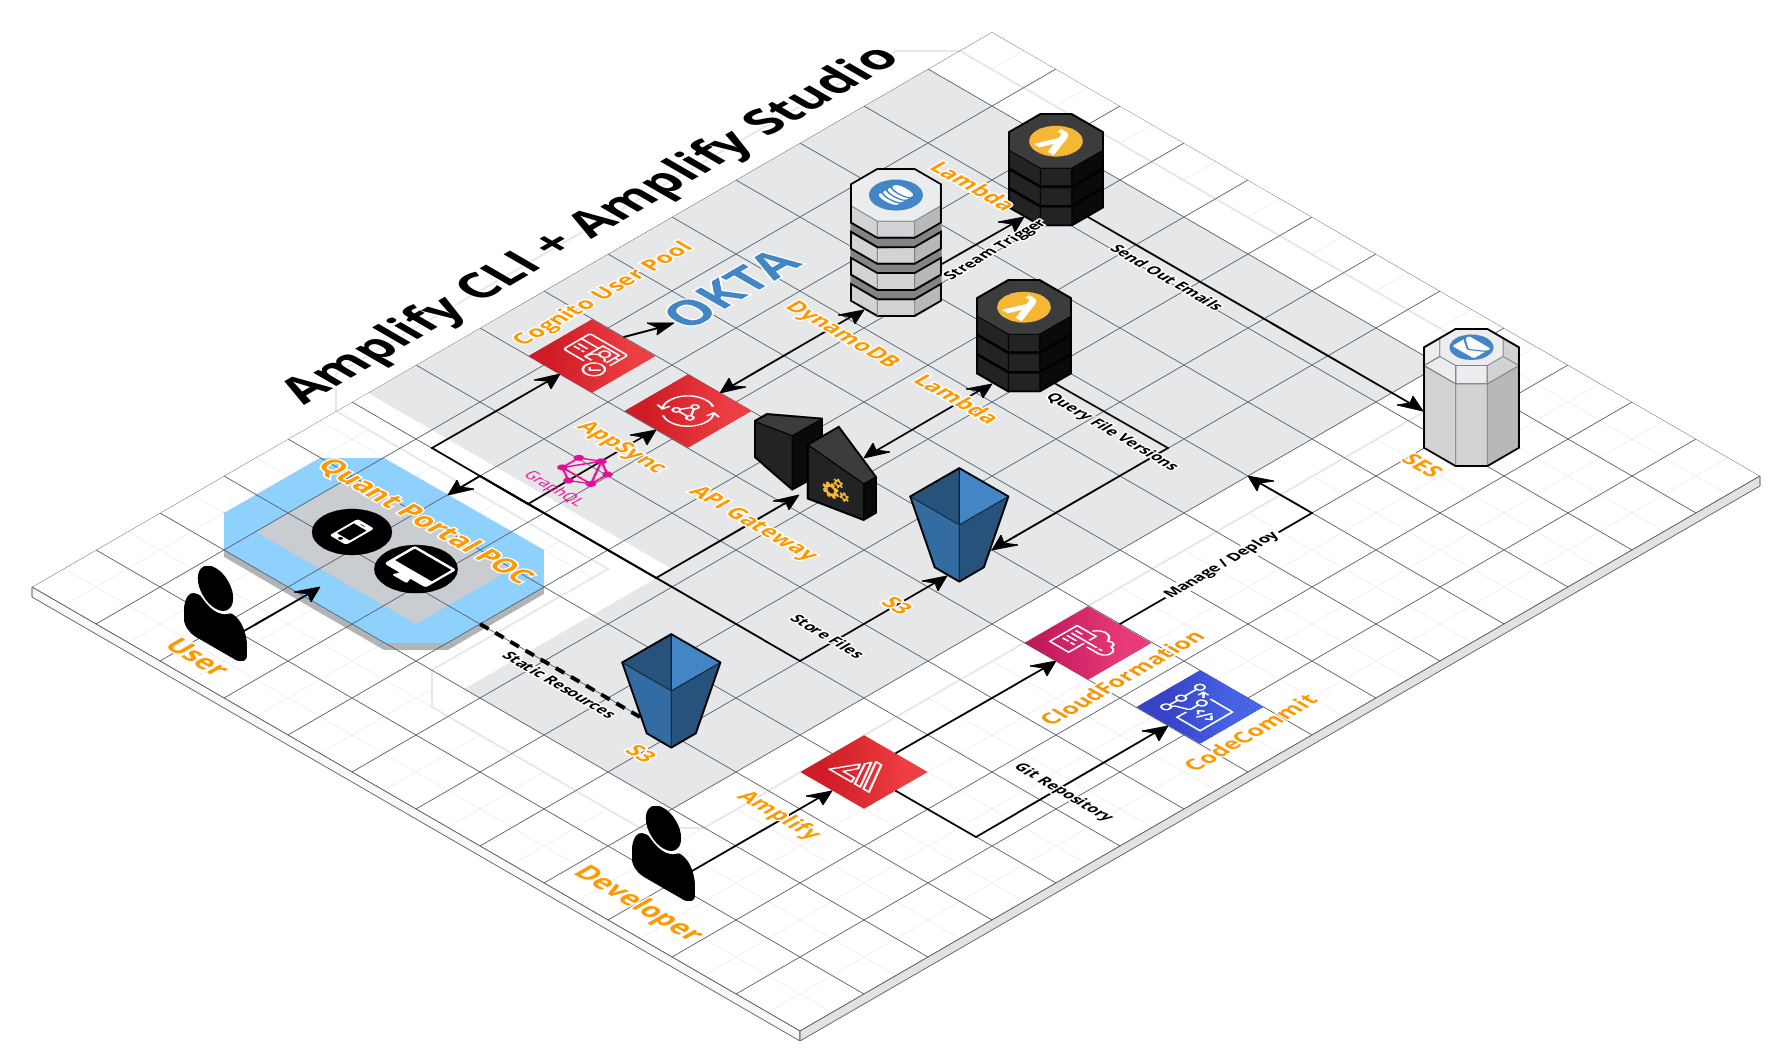
Architecture
This is the whole architecture of this Amplify POC.
Before calling GraphQL each time, the frontend will get a token from Cognito automatically for authentication. After successful verification, it will transfer requests to AppSync, API Gateway, or S3 built-in REST API.
In your React codes, you need to use API.get to call AppSync through QraphQL or use API.get to call a REST API through API Gateway.
There are two ways of Lambda integration, one is triggered by the DynamoDB table, and another is triggered by API Gateway.
Code Structure
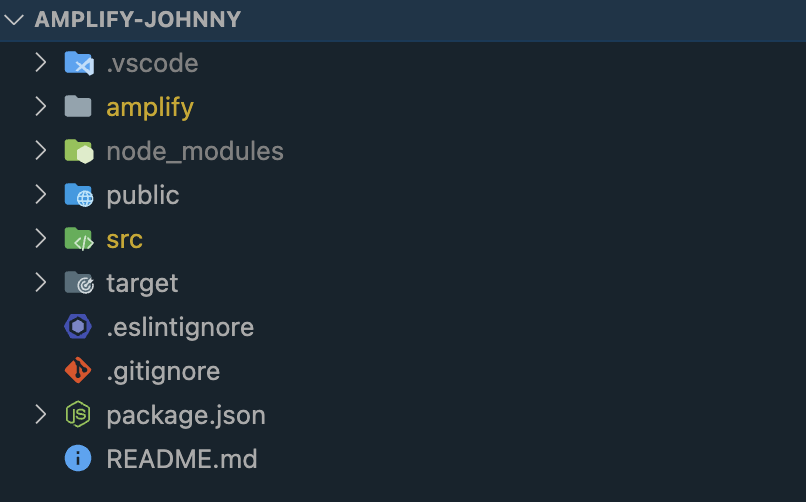
- amplify
- all backend codes (contains authentication, API, Lambda function, storage, etc.)
- public
- all static files (images, icons, and static HTML files)
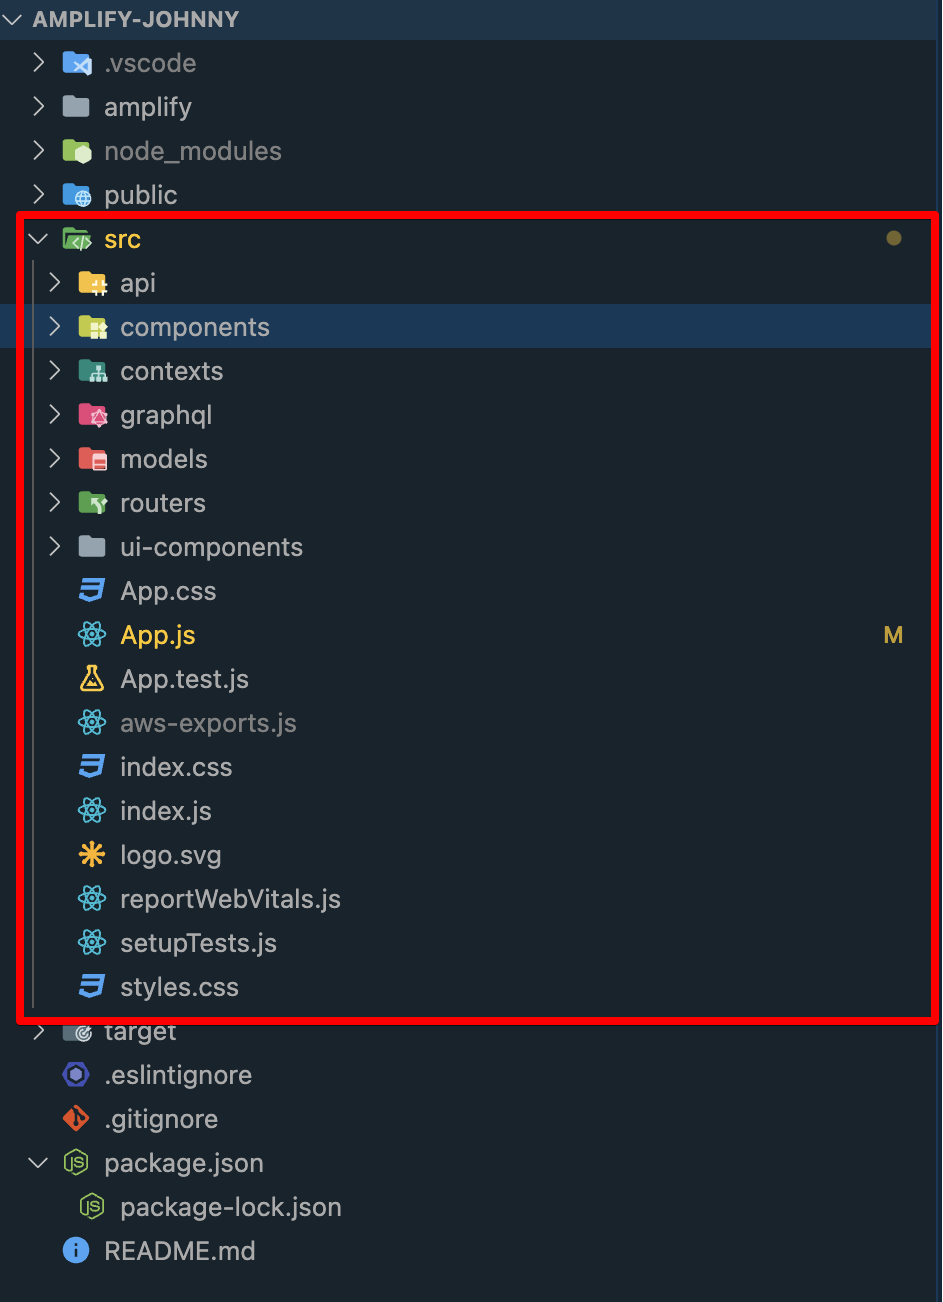
- src
- all React codes
Next, I’ll dive into each item above to explain.
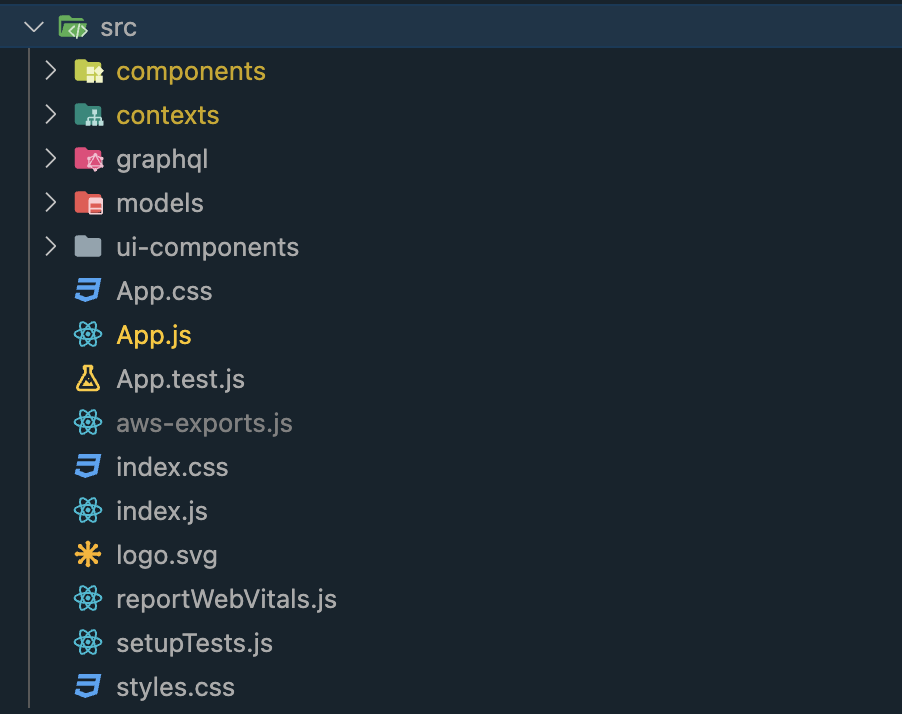
src
- components (self-created)
- All Amplify-created pages are located under the “ui-components” folder. So, it’s better to create a new folder to put your custom page codes. Because after you type
amplify pullcommand, Amplify will replace all pages under ui-components automatically for making sure all page codes are consistent with the UI module in Amplify Studio.
- All Amplify-created pages are located under the “ui-components” folder. So, it’s better to create a new folder to put your custom page codes. Because after you type
- contexts (self-created)
- For putting login and logout logic
- graphql (self-created)
- For putting all GraphQL queries codes
- models
- GraphQL model data
- ui-components (self-created)
- All page codes and are consistent with Amplify Studio
- You can use
amplify pullto update when you did some changes in Amplify Studio
- App.js
- The root code of React
- index.js
- React code
- aws-export.js
- Most important configuration file, don’t change this.
- Contains configuration of auth, API, storage, etc.
- components (self-created)
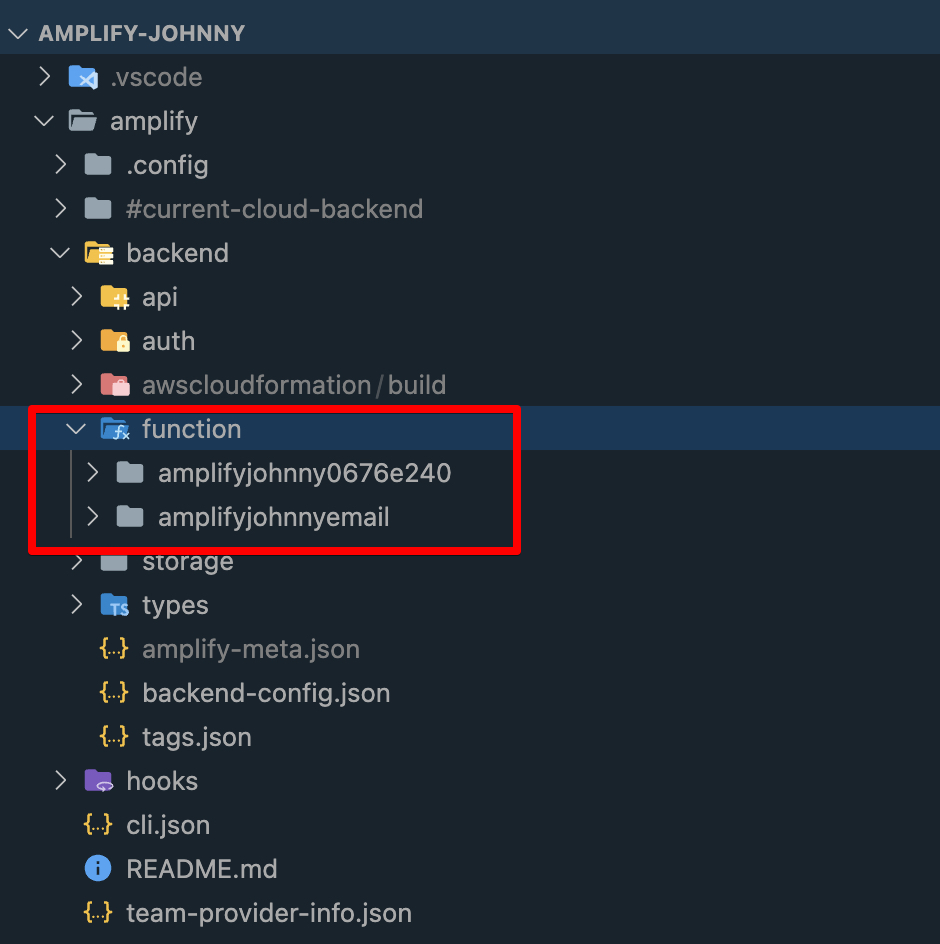
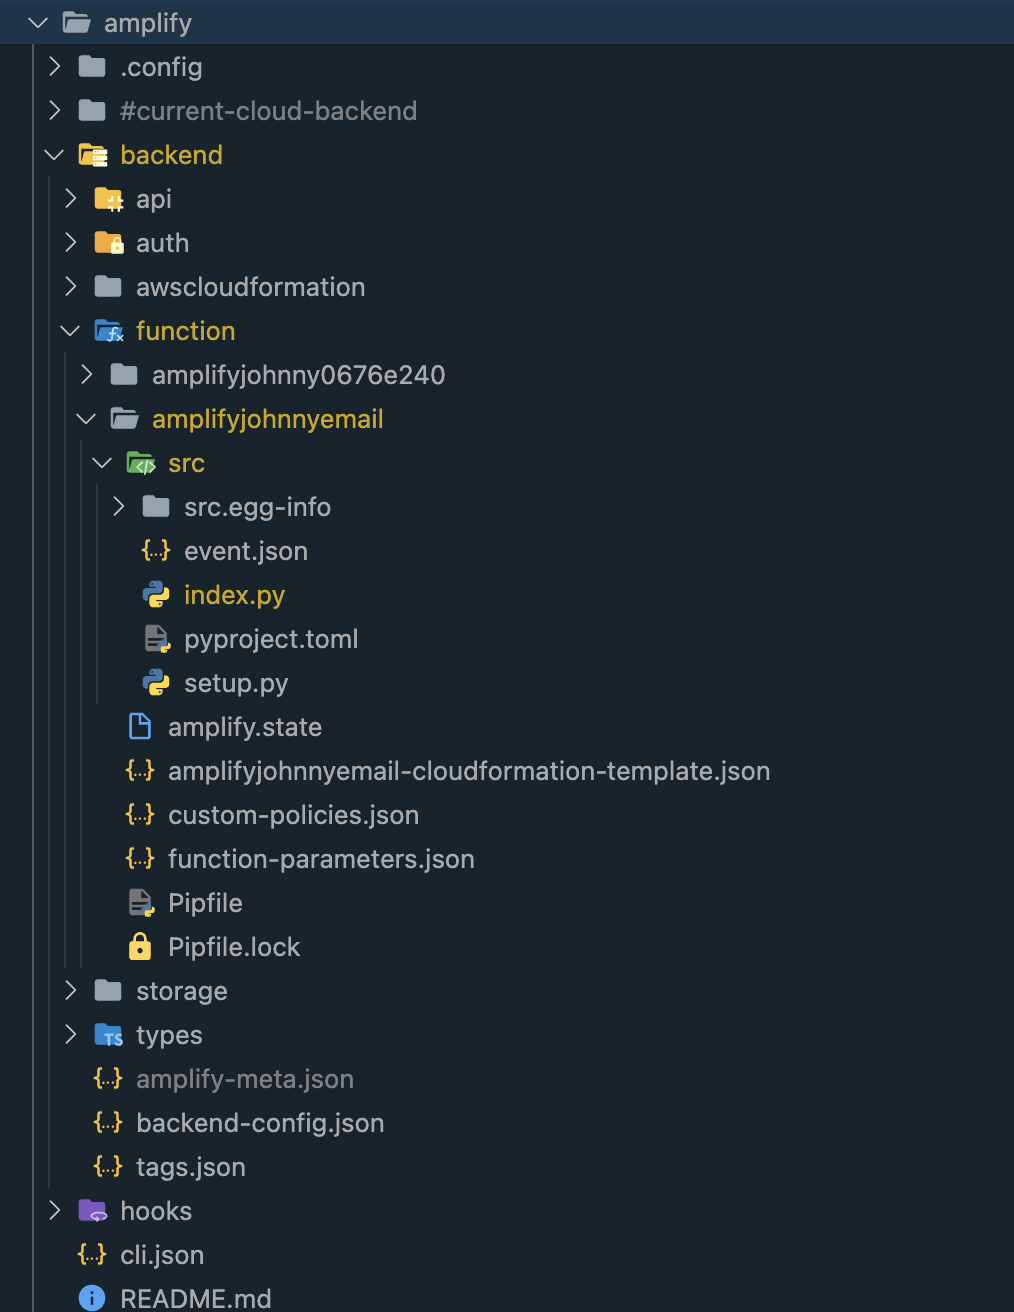
amplify
In folder amplify, you only need to write your codes under function, and don’t change other folders.
Under folder function, it contains all Lambda functions you created by using the command
amplify add function, and you need to choose the Lambda name you created, and write your codes in the index.py file if you choose the python platform for your Lambda.
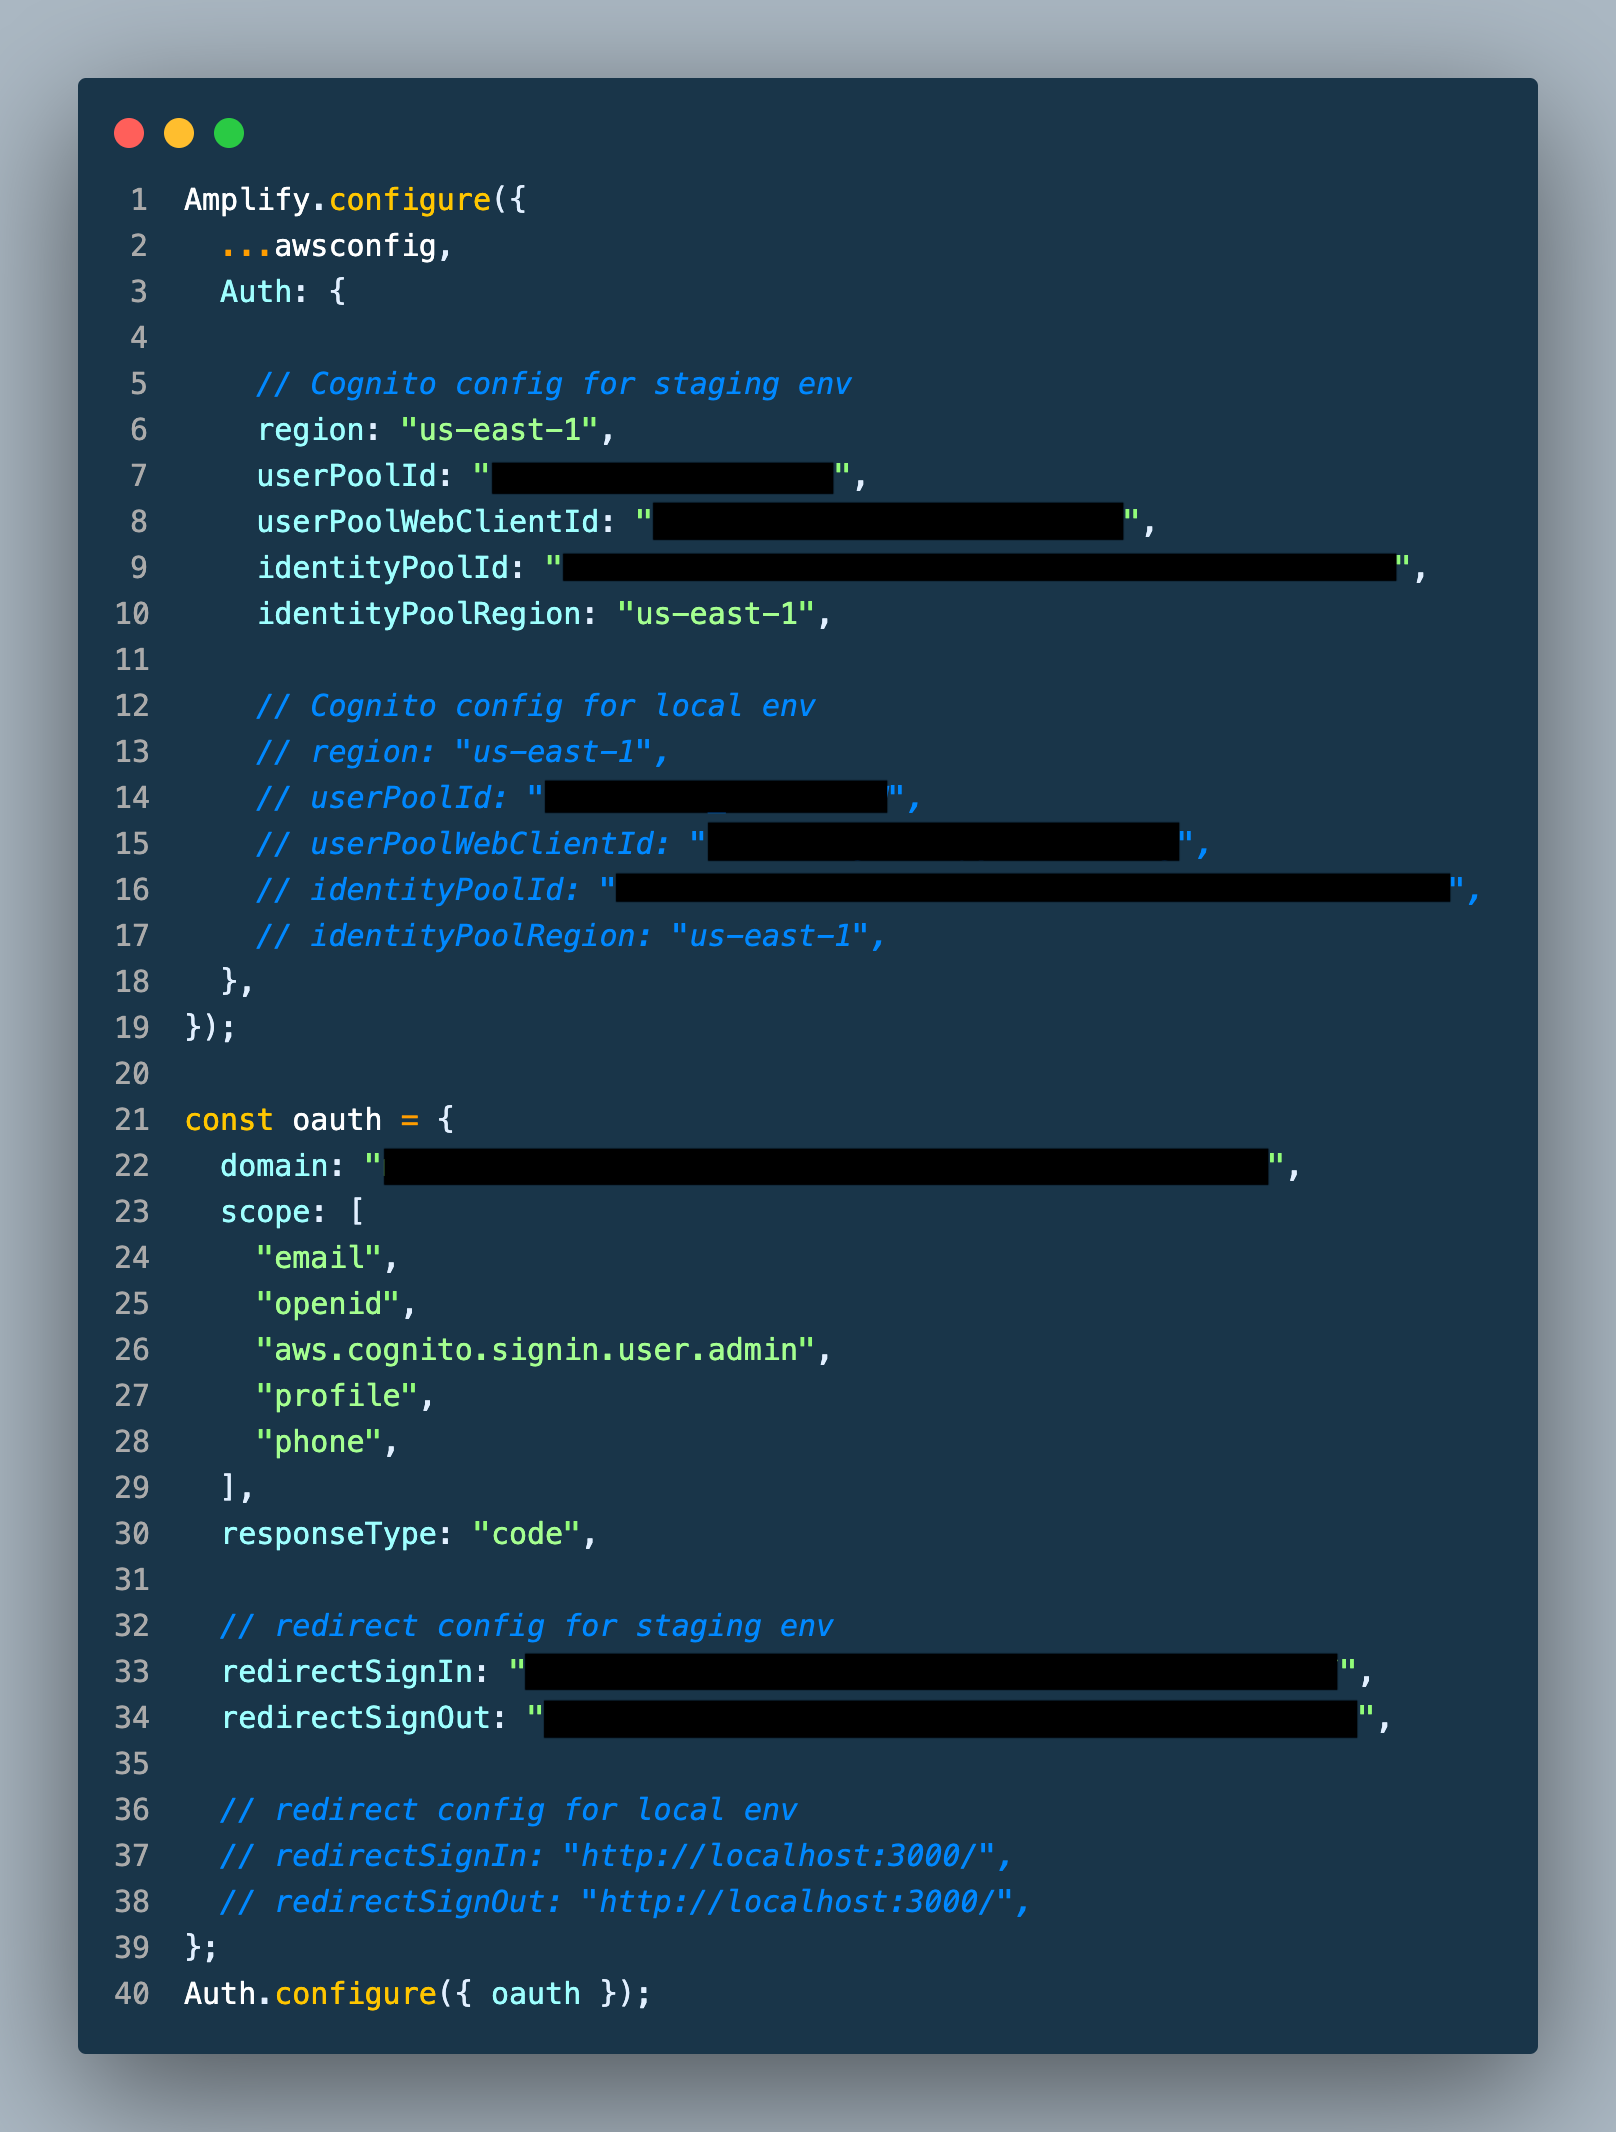
Authentication Configuration
For integrating with AWS Cognito, you not only need to configure by using the command amplify add auth, but also you need to add these codes into your App.js file for authentication configuration.
Because AWS Cognito User Pool has a redirect URL, it’s not convenient to use the same authentication configuration for the local development environment and remote test environment. It’s better to add two sets of authentication configurations. BTW, you need to pay attention to whether the authentication configuration belongs to the test environment or not when you push your codes to the remote branch for CI/CD.
Links you can refer to
Amplify Immersion Day Workshop
https://catalog.us-east-1.prod.workshops.aws/workshops/84db0afb-0279-4d29-ae26-1609043d5bfd/en-US
Amplify UI document
Amplify Framework Documentation
Amplify CLI